How I Repaired My GianiGranite Countertop
This post may contain affiliate links. If you purchase through links on my site, I may earn a commission at no cost to you. For more information, please see my disclosure policy.
I wanted to show you how I repaired my GianiGranite Countertop.

I’d managed to transform the ugly Formica kitchen countertops with a GianiGranite kit I’d purchased online.
But there came a day when I dropped a can of beans right on the edge and chipped the finish. I was upset because the DIY application had held up so well for 14 months. And now I had ruined some of the finish in places that were so painfully obvious.
So I went to my small stash of craft paint. I was determined not to have to purchase anything for this fix.
Luckily, I had a few paint colors that I thought might work to repair the countertop.
How I Repaired The Countertop:

The colors that came in the GianiGranite kit were similar: white, gold, and black.
I looked under my sink for an old toothbrush that I sometimes use to touch up paint.
Then I got a Q-tip and a few toothpicks. I planned to use the toothpicks for the tiniest areas that were damaged.
Lastly, I tore off a paper towel and dampened it at the kitchen sink.

What I Saw Was A Ruined Project:
After the first application, I was horrified by how it looked.
I felt like I’d ruined the whole project by chipping off some of the paint. Had I not dropped that heavy can of beans on the edge of the countertop, I doubt I’d ever have had to repair it.

This was after I’d dabbed on a small amount of all the paint colors on the first damaged spot.
I just kept adding and dabbing and letting it dry. Then after an hour or so, I would go back and work on it a bit more.
I’d dab a little paint on with the toothbrush or a toothpick and then smudge the paint with the damp paper towel.
I knew that to fill in the places that were chipped, I’d have to build up the paint one application at a time. Then I let it dry before I added more.
I just kept at it and hoped for the best outcome.

The Final Application:
This is what it looked like after multiple layers of the various colors of craft paint.
If you get up close, you might see the two places where I repaired the finish. But my eye no longer went straight to those two damaged spots when I entered my kitchen. So I was happy with how my little DIY turned out.
It cost me nothing at all to fix the damaged spots. I still stand by my recommendation of GianiGranite kits for unsightly kitchen countertops.
This is a very durable solution if you don’t have the money for a complete overhaul.
If you live in a rental home, ask your landlord if they’d mind you trying to improve the look of the kitchen countertops with a DIY kit. You never know, they might just be willing to allow it because it won’t cost them anything.
And you might be happier with your kitchen for as long as you live there. That’s the most important thing.


I must say Brenda, every time I see your kitchen, I'm still so impressed over how good your counters look.
I bought a kit like that for the laundry room counter in my other house, but returned it because I was too afraid to go through with it.
The repair job you did looks great! Unless you pointed it out, no one would even notice.
Just a thought, since you used paint, even though it's enamel, does it need to be sealed to protect it from wearing away?
you're wonderful dear bean. beautifully done!
Great job Brenda! I think it takes so much more talent to decorate and DIY like you do than it does to pay a contractor. I admire your creativity and talent. I read your blog because you are like most of us out there who can't afford to pay thousands of dollars to fix and decorate. Keep up the good work!
Clara
Redeemed Junk
Outstanding job, BOTH times!
That's an awesome repair, Brenda. You really are an artist.
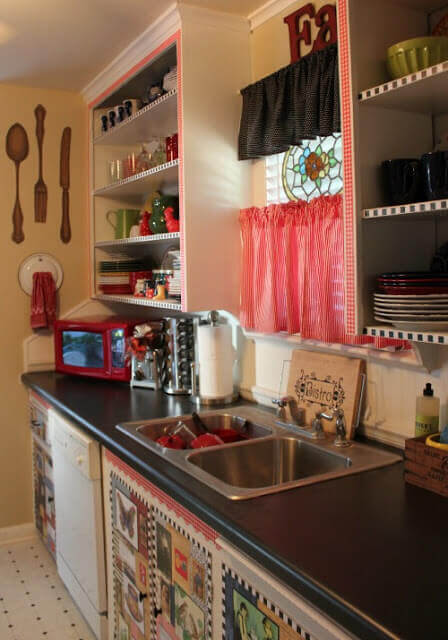
You did a great job both times — with the original transformation on the entire countertop, and then with your repair work. It sounds like you had confidence in yourself that you could fix it, and you did! Your kitchen still looks so inviting, with no chips in the counter to mar it.
You are very creative and the countertop looks great!
You did an amazing job repairing that, Brenda! I'm really impressed with how well those counters have held up, what a great product!
Wow Brenda you have done a great job on the counter top both before and after your accident. We have granite countertops in our present home and I just hate the color (much too dark) and I must admit I have often dropped things too but luckily it hasn't broken. I have never heard of the product GianiGranite but it sounds like a great product. I went into the website and looked at the befores and afters, it does a great job on old or formica counters. I like the color you chose too.
wow, nice job!
well done indeed~!!! looks beautiful.
The counter tops look great and your fix is great. Glad you were able to do that with no $$ involved.
I used a similar treatment about 6 years ago and it's held up and I cook a LOT.I recommend this highly for anyone who needs a change for their existing counters.
You did a great job, it looks amazing.